{getToc} $title={Table of Contents} $count={Boolean}
The world is increasingly conscious of sustainable living, and for good reason! Conserving water is paramount, and one way to do this is by implementing*Rainwater Harvesting Design for Homes. I decided to dive into this, not just because I'm an eco-conscious person, but also because my water bill was starting to resemble the national debt! This article explores my (slightly bumpy, occasionally hilarious) journey into designing a rainwater harvesting system for my humble abode, from initial concept to (hopefully) successful implementation. I'll cover everything from the why to the how, and hopefully inspire you to collect some drops of your own!
Why I Decided to Design a Rainwater Harvesting System
Okay, so the rising water bill was a major motivator. But it's more than just the money. I live in a region that occasionally faces water restrictions during dry spells. The thought of my precious garden shriveling up because of water scarcity was just… tragic. Plus, there’s something deeply satisfying about harnessing a natural resource that’s literally falling from the sky! The idea of reducing my reliance on municipal water, even a little bit, felt empowering.
To be honest, I also wanted a cool, slightly geeky project. I’m not going to pretend I wasn’t drawn in by the DIY aspect and the potential for bragging rights (quietly, of course) when friends come over. So, armed with enthusiasm, a slightly dog-eared copy of "Sustainable Living for Dummies," and a You Tube connection, I embarked on my quest for*Rainwater Harvesting Design for Homes.
My (Somewhat Chaotic) Rainwater Harvesting Design Process
Phase 1: Research & Planning (aka the "Oh My God, What Have I Gotten Myself Into?" Phase)
This phase involved a LOT of reading. I quickly discovered thatRainwater Harvesting Design for Homes wasn’t as simple as sticking a bucket under a downspout (although, that's technically harvesting rainwater, just not veryefficiently*). I needed to consider: Roof Area: How much rainwater could I actually collect? Rainfall Data: How much rain did my area typically get? Storage Capacity: How big of a tank did I need? Filtration: I definitely didn’t want to water my tomatoes with bird poop. *Plumbing: Could I evenconnectthis thing to my irrigation system?
The spreadsheets were a thing of beauty… or maybe a testament to my over-caffeinated state. I learned about first flush diverters (to discard the initial dirty rainwater), various filtration methods (mesh screens, sand filters, activated carbon), and the mind-boggling array of tank sizes and materials.
*The Difficulty: The sheer volume of information was overwhelming. I felt like I was drowning in a sea of technical terms and confusing diagrams. Also, figuring out local regulations was a bureaucratic nightmare.
*The Surprise: I was surprised by how muchsciencewas involved! I hadn’t anticipated needing to calculate flow rates and pressure loss. I thought I was just collecting rainwater!
Phase 2: Design & Component Selection (aka the "Shopping Spree... Kind Of" Phase)
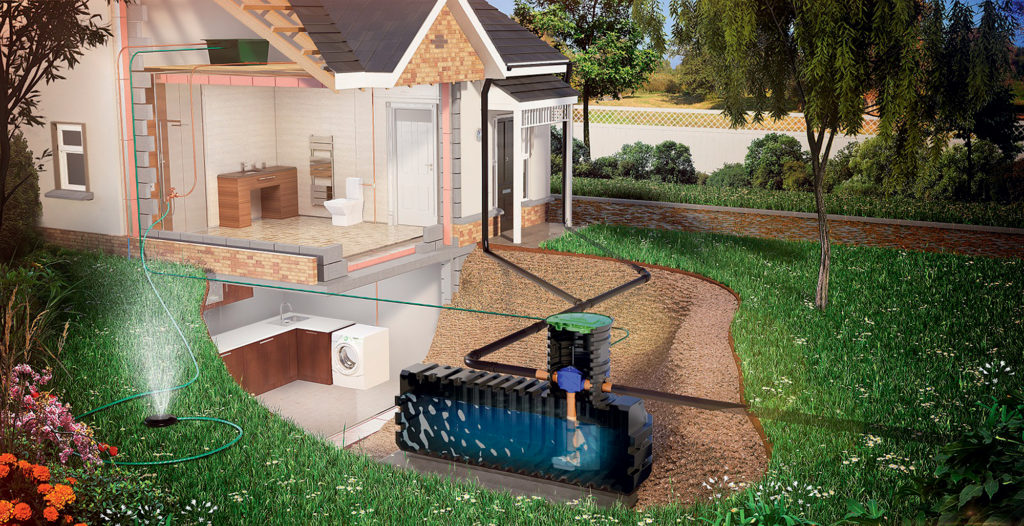
This was where the theoretical became (slightly) more practical. Based on my research, I decided on a system that included:
A 500-gallon polyethylene storage tank (big enough, but not so big it required a crane to install).
Gutter screens to filter out leaves and debris.
A first flush diverter to remove the initial dirty rainwater.
A simple mesh filter for additional cleaning.
A small submersible pump to deliver the water to my garden.
Rainwater Harvesting Design for Homes isn't cheap. While I was hoping to save money in the long run, the initial investment was substantial. I found myself comparing prices online, scouring local hardware stores for deals, and debating the merits of a stainless-steel filter versus a plastic one.
*The Difficulty: The cost! I tried to stick to my budget, but those "nice-to-have" features were SO tempting. And the fear of buying thewrongpart kept me second-guessing every decision.
The Surprise: How much stuff therewas! Who knew there were so many different types of pipes, fittings, and connectors? I spent an embarrassing amount of time wandering the plumbing aisle, utterly confused.
Phase 3: Installation (aka the "My Back Hurts and I'm Covered in Mud" Phase)
This was the most physically demanding part. I enlisted the help of a (slightly reluctant) friend, bribing him with pizza and the promise of future garden produce.
Installing the gutter screens was relatively easy. The first flush diverter was a bit more complicated, requiring some careful cutting and fitting. But the real challenge was the storage tank. Getting that behemoth into place was a wrestling match that I'm not sure I won.
The plumbing… oh, the plumbing! I spent hours contorting myself into awkward positions, trying to connect pipes and fittings in tight spaces. There were leaks, of course. Several leaks. And more trips to the hardware store than I care to admit.
*The Difficulty: Everything! Lifting heavy objects, working in cramped spaces, and trying to understand plumbing diagrams while covered in dirt and sweat was… challenging.
*The Surprise: How much I actually enjoyed it! Despite the physical exertion and the occasional frustration, there was a sense of accomplishment in building something with my own hands. Plus, my friend and I had some good laughs (mostly at my expense).
Phase 4: Testing & Refinement (aka the "Will This Actually Work?" Phase)
After what felt like an eternity, the system was finally installed. It was time for the moment of truth. I waited for a rainstorm, nervously watching the clouds gather.
When the rain finally came, I raced outside to inspect my creation. The gutter screens worked perfectly, keeping out leaves and debris. The first flush diverter did its job, diverting the initial dirty water. And the storage tank… slowly, but surely, it began to fill.
There were a few minor tweaks needed, of course. A couple of leaky connections that needed tightening, and the realization that my puny little pump wasn't quite powerful enough to water my entire garden at once. But overall… it worked!
*The Difficulty: Patience! Waiting for it to rain felt like an eternity. And troubleshooting the minor issues was frustrating.
*The Surprise: The sheer joy of seeing it work! Watching that tank fill up with rainwater was incredibly satisfying. It felt like I had actually accomplished something worthwhile.
Answers and Questions About Rainwater Harvesting Design for Homes
Question: Is Rainwater Harvesting Design for Homes*expensive?
*Answer: It can be, but it depends on the scale of your system. Smaller systems are more affordable, while larger, more sophisticated systems can be a significant investment. However, you can save money in the long run by reducing your water bill.
*Question: Is it difficult to design a Rainwater Harvesting System?
Answer: Not necessarily. You can start with a simple system and gradually expand it as your needs evolve. There are also plenty of resources available online and in libraries to help you with the design process. Planning your Rainwater Harvesting Design for Homes*is essential.
Question: What are the benefits of Rainwater Harvesting Design for Homes?
*Answer: Reduced water bills, conservation of water resources, decreased reliance on municipal water, and a more sustainable lifestyle. Plus, you get bragging rights (see above).
*Question: Can I drink the rainwater I collect?
*Answer: Maybe. Potable rainwater harvesting systems require more advanced filtration and disinfection methods to ensure the water is safe to drink. It's important to consult with a qualified professional to determine the best approach for your needs.
Question: What if it doesn't rain much where I live? Is Rainwater Harvesting Design for Homes*worth it?
*Answer: Even in drier climates, rainwater harvesting can be beneficial. Every drop counts, and even a small amount of collected rainwater can be used for irrigation or other non-potable purposes.
The Final Result & My Reflections
Did myRainwater Harvesting Design for Homes project turn out perfectly? No. There were hiccups, setbacks, and moments where I questioned my sanity. But it worked! I now have a functional rainwater harvesting system that provides supplemental water for my garden. My water bill has decreased slightly (although I'm still waiting for it to resemble a reasonable number), and I feel good about contributing to a more sustainable lifestyle.
I felt a mixture of anxiety, excitement, and sheer determination throughout the process. There were times when I doubted my abilities, but I pushed through, learning as I went.
*Looking back, I learned a lot about plumbing, rainwater harvesting, and my own resilience. I also gained a new appreciation for the professionals who design and install these systems for a living. It's not as easy as it looks!
My perspective on sustainability has also shifted. It's not just about grand gestures; it's about making small, incremental changes that can collectively have a big impact.
Conclusion
Designing and installing aRainwater Harvesting Design for Homes was a challenging but ultimately rewarding experience. While my journey had its share of muddy moments and confusing plumbing diagrams, the end result is a system that saves water, reduces my bills, and contributes to a more sustainable lifestyle. If I can do it, so can you. So go ahead, get those gutters ready and start collecting those precious raindrops! The planet (and your wallet) will thank you for it.